Please refer to my previous posts on how to get Oracle XE installed and a demonstration of the HR Schema Sample Data.
The dynamic nature of Groovy with built-in support for Sql really shines on quick scripts like this example:
def printHeader(name, sql){
println """\nThere are
${sql.firstRow("SELECT COUNT(*) TOTAL FROM ${name}".toString()).TOTAL}
total ${name.toLowerCase()}."""
println "\n${name}\n${"=".multiply(name.size())}"
}
import groovy.sql.Sql
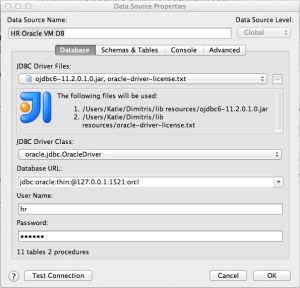
sql = Sql.newInstance("jdbc:oracle:thin:@127.0.0.1:1521:orcl",
"hr", "oracle", "oracle.jdbc.pool.OracleDataSource")
printHeader("EMPLOYEES", sql)
sql.eachRow("SELECT FIRST_NAME, LAST_NAME FROM EMPLOYEES") {
println "${it.FIRST_NAME} ${it.LAST_NAME}"
}
printHeader("COUNTRIES", sql)
sql.eachRow("SELECT COUNTRY_NAME FROM COUNTRIES") {
println it.COUNTRY_NAME
}
printHeader("DEPARTMENTS", sql)
sql.eachRow("SELECT DEPARTMENT_NAME FROM DEPARTMENTS") {
println it.DEPARTMENT_NAME
}
printHeader("REGIONS", sql)
sql.eachRow("SELECT REGION_NAME FROM REGIONS") {
println it.REGION_NAME
}
Please note that the ojdbc jar is provided in the classpath.
Pay attention on the easiness by which we create the connection doing the needed import on the spot:
import groovy.sql.Sql
sql = Sql.newInstance("jdbc:oracle:thin:@127.0.0.1:1521:orcl",
                "hr", "oracle", "oracle.jdbc.pool.OracleDataSource")
Also the easiness and compactness by which we iterate through the result set via the help of closures and the default it reference is unparalleled in the ecosystem of JVM languages:
sql.eachRow("SELECT FIRST_NAME, LAST_NAME FROM EMPLOYEES") {
            println "${it.FIRST_NAME} ${it.LAST_NAME}"
        }
For the demo purposes I’ve created a function that is creating the printed header output. It is accepting Sql instance on the input parameters which is not advisable but I wanted to demonstrate the powerful GString injection within a String literal:
def printHeader(name, sql){
    println """\nThere are
             ${sql.firstRow("SELECT COUNT(*) TOTAL FROM ${name}".toString()).TOTAL}
             total ${name.toLowerCase()}."""
    println "\n${name}\n${"=".multiply(name.size())}"
}
Please note how we inject the table name on the SQL literal and also how we are populating the underlying of the table name header using the size of the table name string. Moreover by surrounding the literal with triple double-quotes we can expand across multiple lines without needing implicit/explicit concatenation.
The above code yields output:
There are 107 total employees.
EMPLOYEES

=========

Ellen Abel

Sundar Ande

Mozhe Atkinson

David Austin

Hermann Baer

Shelli Baida

Amit Banda

Elizabeth Bates

Sarah Bell

David Bernstein

Laura Bissot

Harrison Bloom

Alexis Bull

Anthony Cabrio

Gerald Cambrault

...
There are 25 total countries.
COUNTRIES
=========
Argentina
Australia
Belgium
Brazil
Canada
Switzerland
China
Germany
Denmark
Egypt
France
HongKong
Israel
India
Italy
Japan
Kuwait
Mexico
Nigeria
Netherlands
Singapore
United Kingdom
United States of America
Zambia
Zimbabwe
There are 27 total departments.
DEPARTMENTS
===========
Administration
Marketing
Purchasing
Human Resources
Shipping
IT
Public Relations
Sales
Executive
Finance
Accounting
Treasury
Corporate Tax
Control And Credit
Shareholder Services
Benefits
Manufacturing
Construction
Contracting
Operations
IT Support
NOC
IT Helpdesk
Government Sales
Retail Sales
Recruiting
Payroll
There are 4 total regions.
REGIONS
=======
Europe
Americas
Asia
Middle East and Africa

![.HR.EMPLOYEES - ScalaProj - [~_Dimitris_ScalaProjects_ScalaProj]](https://dimitrisli.files.wordpress.com/2012/08/hr-employees-scalaproj-_dimitris_scalaprojects_scalaproj.jpg?w=300)
![DATABASE_1f59cfcd-b0bc-4ab3-a0ca-fd6402de2165.schema_HR - ScalaProj - [~_Dimitris_ScalaProjects_ScalaProj]](https://dimitrisli.files.wordpress.com/2012/08/database_1f59cfcd-b0bc-4ab3-a0ca-fd6402de2165-schema_hr-scalaproj-_dimitris_scalaprojects_scalaproj.jpg?w=300)
![Oracle Developer Days [Running]](https://dimitrisli.files.wordpress.com/2012/08/oracle-developer-days-running1.jpg?w=300)
![Oracle Developer Days [Running]-1](https://dimitrisli.files.wordpress.com/2012/08/oracle-developer-days-running-1.jpg?w=300)


